Overview
Data encryption helps prevent unauthorised entity from reading data. This includes saved data on a persistence media which is called Data In Rest, and data that are transferred on network which is called Data In Transit. Also, considering Integrity of data is completely obvious.
Data in transit can be encrypted in multiple layers with different protocols, such as IPsec in the Layer 3 or SSL/TLS in the Layer 7. SSL and TLS are two of the most common security protocols used today. They are designed to provide a secure communication channel between two parties through a Public Key, digital signatures, and encryption. This article is not supposed to talk about the SSL/TLS however it was general overview of reason of using Public Key Infrastructure (PKI) that normally called certificate.
This article is going to tell you how you can install a certificate on Cisco Secure Email Gateway or Email Security Appliance (ESA), What options should be updated after certificate has been installed, and How you can test the new certificate has affected.
Installing the Certificate
To import the certificate into Cisco Secure Email Gateway (ESA) you can use either GUI or CLI.
GUI
At least in my point of view, this is the easiest way to import a certificate In the GUI you should follow the below direction:
Network -> Certificates -> Add Certificate.. -> Select Import Certificate -> Click on Next

To importing the certificate a PFX version of the certificate is required. If you just have private key and the public key you can use “OpenSSL” command line tool for create a PFX file. To do so, the below command will create the PFX file.
openssl pkcs12 -export -out your_output_cert.pfx -inkey your_private_key.key -in your_public_key.cer -certfile Certificate-chain.cerNote:
- However you can create a PFX file without a passphrase but to install the PFX file into the Cisco Secure Email Gateway (ESA) a passphrase is mandatory.
If you get the “Validation Error: Certificates signature verification failed.” Error you should assess two options:

- Make sure that issuer trusted chain (Root Certificate, Intermediates Certificates)is available in ESA trusted root certificates.
- Check ESA time
CLI
To updating certificate over SSH connection use the certconfig commands in order to import the certificate:
esa.nssnote.com> certconfig
Choose the operation you want to perform:
- CERTIFICATE - Import, Create a request, Edit or Remove Certificate Profiles
- CERTAUTHORITY - Manage System and Customized Authorities
- CRL - Manage Certificate Revocation Lists
[]> certificate
hoose the operation you want to perform:
- IMPORT - Import a certificate from a local PKCS#12 file
- PASTE - Paste a certificate into the CLI
- NEW - Create a self-signed certificate and CSR
- EDIT - Update certificate or view the signing request
- EXPORT - Export a certificate
- DELETE - Remove a certificate
- PRINT - View certificates assigned to services
[]> paste
Enter a name for this certificate profile:
> esa-mar2023
Paste public certificate in PEM format (end with '.'):
-----BEGIN CERTIFICATE-----
MIIFXTCCBEWgAwIBAgITZgAAABPb5ZnW9I
2M6cFFkC6VkrsAXbneCTNMmryuDiXAaBkJ
-----END CERTIFICATE-----
.    < '.' act as a next button in CLI >
C=US,ST=CA,L=CA,O=NSSNOTE,OU=SECOPS,CN=esa11.nssnote.com
Paste private key in PEM format (end with '.'):
-----BEGIN RSA PRIVATE KEY-----
LZqWF3d+LxVMnaN9BttFFkC6VkrsAXbneCNMmry
oIQcMKBcmheT8zEU+Kij2lFG/K4sprp8AqH3g==
-----END RSA PRIVATE KEY-----
.    < '.' act as a next button in CLI >
Do you want to add an intermediate certificate? [N]> N
Do you want to check if Common Name is in Fully Qualified Domain Name(FQDN) format ? [N]> N
List of Certificates
Name       Common Name           Issued By             Status         Remaining  FQDN compliance checked
---------  --------------------  --------------------  -------------  ---------  -----------------------
esa-mar20  esa11.nssnote.com     nssnote-DC01-CA       Valid            729 days          No
nssnote.c  nssnote.com           nssnote-DC01-CA       Active           729 days          No
Cisco ESA  Cisco ESA Certificat  Cisco ESA Certificat  Valid           1094 days          No

Choose the operation you want to perform:
- IMPORT - Import a certificate from a local PKCS#12 file
- PASTE - Paste a certificate into the CLI
- NEW - Create a self-signed certificate and CSR
- EDIT - Update certificate or view the signing request
- EXPORT - Export a certificate
- DELETE - Remove a certificate
- PRINT - View certificates assigned to services
[]>
Note:
In CLI, private key must be in a PEM format. If your private key is based on the RSA key based64 format, you can use the Openssl to change it to PEM format.
openssl rsa -in Privatekey.key -text > Privatekey.pemNext step is updating features that are using certificates.
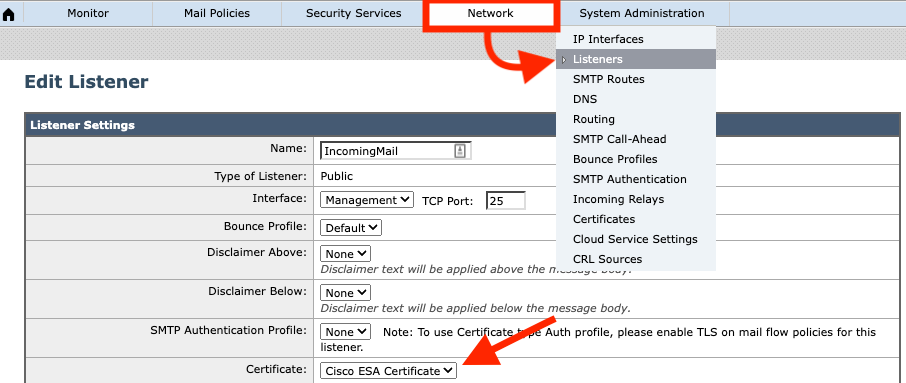
Inbound TLS
According to best practice you should have enabled TLS on the public listener to encrypting SMTP traffic. It is assumed this configuration has been done, and for updating the certificate you should use this direction:
Network -> listener -> Listener Name -> Certificate

Admin Portal
As you know management changes must be done over HTTPS/SSH connection. So, next step is updating the certificate usage for admin portal.
Network -> IP Interface -> IP Interface Name -> Certificate

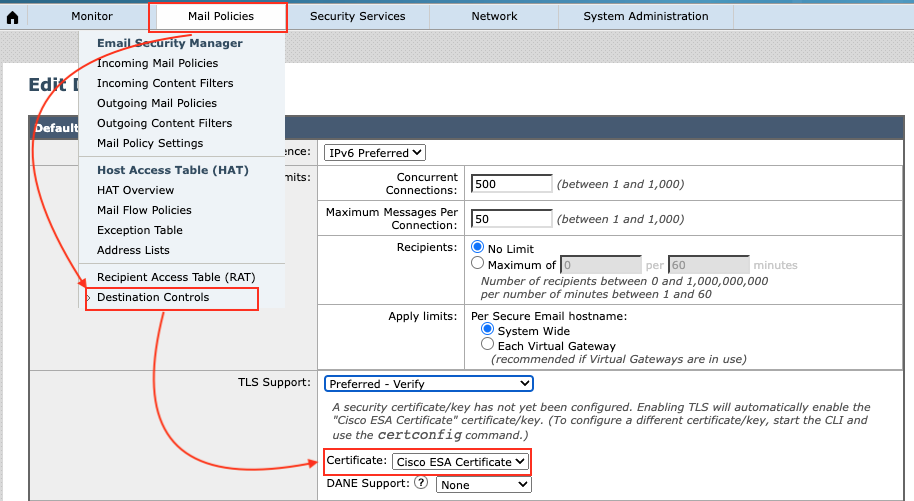
Outbound TLS
It is possible to use the certificate for outbound traffic. You might have multiple profile for different domains; which certificate must be updated for all of them.
Mail Policies -> Destination Controls -> Policy Name -> Certificate

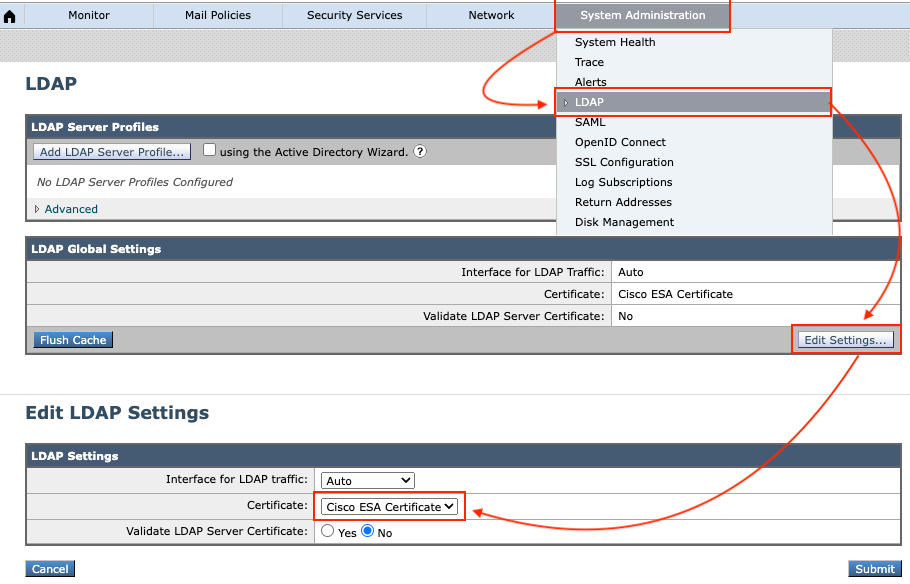
LDAP
It is possible to use a specific certificate for LDAP connection such as internal certificate; it can be managed from the direction below:
System Administration -> LDAP -> LDAP Global Setting -> Edit Settings -> Certificate

Verifying installed certificates
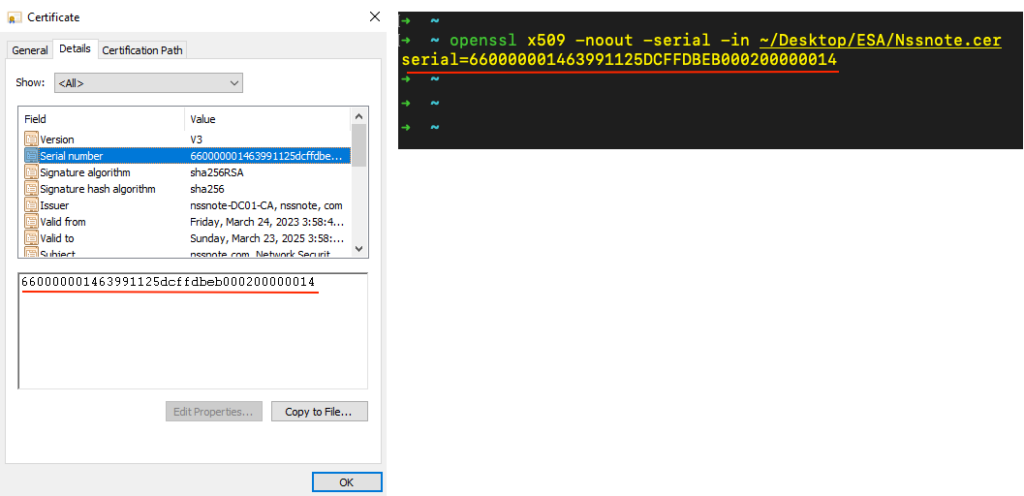
There are some unique parameters in a certificate you can assess to make sure new certificate has enabled successfully, however I prefer to compare the Certificate’s Serial Number. There are different options to display public key’s serial number, and two easiest options are:
- For windows users: open the public key, headed to the Detail tab and click on “Serial Number”
- For Linux based users: Openssl tool might be more convenient.
openssl x509 -noout -serial -in Your_Certificate.cer

Verifying the HTTPS certificate on the Cisco Secure Email Gateway admin portal is a straightforward task. Open your browser and go to your ESA’s management page, and you can see the certificate by clicking on the lock icon on the top left corner of your browser.

Verifying the SMTP’s certificate is a little be complicated. To verify the certificate that is used by listener or SMTP’s certificate, “Openssl” might be a useful tool. The output of the below command is the serial number of certificate that is using by ESA on the Listener.
openssl s_client -connect esa.nssnote.com:25 -starttls smtp < /dev/null 2>/dev/null | openssl x509 -serial -sha256 -noout -in /dev/stdin
I hope this post was informative for you.
It`s so useful